Installation and configauration
4G SD Card installation and configuration
note: Before configuring the device, please confirm the status of the device’s WIFI/4Gdial switch. When the dial switch is placed close to the side of the 4G card slot, it is in the 4G configuration mode; the dial switch is placed to the side away from the 4G card slot. When it is WIFI configuration mode.
Switching the status of the dial switch must be performed while the device is powered off.

Status light prompt of 4G camera tail line:
In 4G mode:
1. Slow flashing: The 4G module or the SIM card is abnormal and flashes once every 2s.
2. Fast flashing: No dialing number (no flow or bad signal), flashing once every 0.5s.
3. Always on: The network is normal.
In Wifi mode:
1. Slow flashing: In hotspot mode, it flashes once every 2s.
2. Fast flashing: The device is configured to the router, but the connection is disconnected and flashes once every 0.5s.
3. Always on: The network is normal.
Add a 4G camera
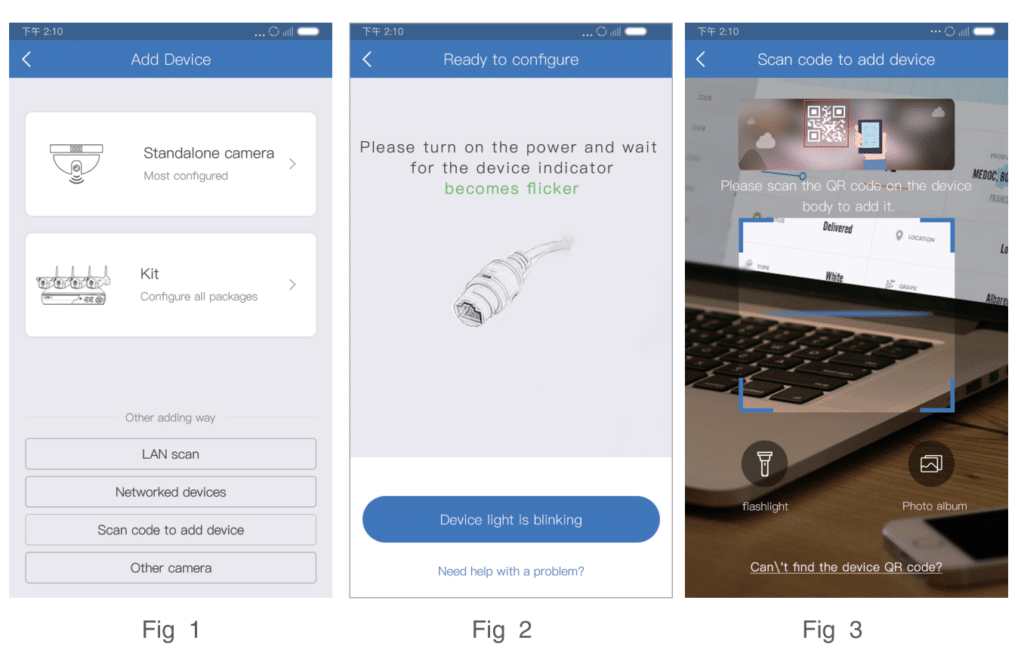
1. After successfully downloading and installing the APP, log in to the App;2. Click “+” in the device list (Figure 1) and jump to the QR code scanning interface.
(Figure 2);
3. When your device has a 4G card with Internet, and the dial switch is placed close to the side of the 4G card slot, please check the process of 4G mode addition in 1.1. When the dial switch is placed to the side away from the 4G card slot, please check the process of WiFi mode adding in 1.2.

1.1 Add process with 4G mode
(1). Make sure the device has an available 4G card , and WiFi/4G dial switch is placed to the side of the 4G card slot;
(2). Connect the device to the power supply and wait for the device indicator to become normally on ;
There is a QR code on the device :
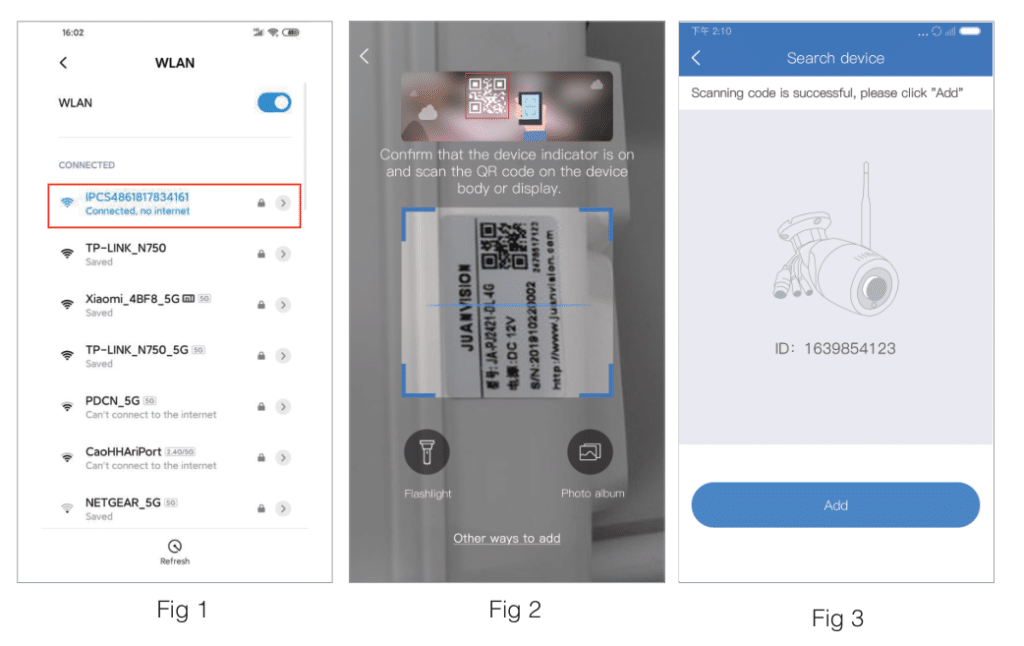
(1). Scan the QR code of the camera body (Figure 1), and click “Add” on the search device page (Figure 2);
(2). Set the device name(Figure 3), after confirming, return to the device list to display the device (Figure 6).
There is a QR code on the device :
(1). Scan the QR code of the camera body (Figure 1), and click “Add” on the search device page (Figure 2);
(2). Set the device name(Figure 3), after confirming, return to the device list to display the device (Figure 6).

Device QR code cannot be found:
(1). Click “Other ways to add” on the QR code scanning interface(Figure 1);
(2). Select the connected device (Figure 4);
(3). Input the device ID and name in the ID adding interface, click complete in the upper right corner (Figure 5), and return to the device list after adding is successful (Figure 6).


1.2 Add process with WiFi mode
1.2.1 Adding Process to Non-networked Devices
(1). Make sure the dial switch is placed to the side, away from the 4G card slot;
(2). Connect the device to the power supply and wait for the device indicator to flash slowly (in hotspot mode, flash once every 2s);
(3). Please go to the phone system settings and select the device hotspot, starting with IPC. The default password is 11111111 (Figure 1)
(Hint: Please keep the device hotspot connected during the connection process.)
There is a QR code:
(1). After connecting to the hotspot, return to APP, scan the QR code of the device (Figure 2), and click “Add” on the search page (Figure 3);
(2) View video via WIFI or another network; please select Remote View. View video without network, select Direct Connection.
Remote view: Click the “Remote view” button (Figure 4) to go to the configuration network interface. The system will display the WiFi search near the device below the interface. Select or input the routing WiFi name and password at home (Figure 5) and click OK. The device is configured with WiFi(Figure 6). After the configuration is successful, follow the interface to complete the device name and password settings (Figures 7 and 8). After the addition is successful, return to the device list.
Direct Connection: Click the “Local direct connection” button (Figure 4), pop-up box for setting the device name, follow the interface content to complete the device name and password settings (Figure 7, 8), and return to the device list after adding successfully.
Device QR code cannot be found:
(1). After connecting to the hotspot, return to the APP, enter the QR code scanning interface, and click “Other ways to add” (Figure 2);
(2). Select the wireless standalone camera (Figure 9). For the subsequent network configuration steps, please refer to the second step for adding the QRcode to the device.


1.2.2 Add process of the networked device
When there is a QR code on the device:
(1). Scan the QR code on the device (Figure 1), click “Add” on the search page(Figure 2);
(2). Set the device name (Figure 3), Input the correct password (Fig 4) (skip this step. There is no password), and return to the device list after adding successfully.
If unable to find the QR code on the device:
1:LAN search device and add process
(1). Please go to the mobile phone system settings and connect the hotspot of the device to ensure that the mobile phone and the device are under the same WiFi;(2). Open the Eseecloud APP and enter the QR code scanning interface, click”Other ways to add” (Figure 1);
(3). Select LAN scan (Figure 5);
(4). Select the required device ID in the scanning interface (Figure 6), click Add to enter the ID-adding interface, input the device name and password, complete in the upper right corner, and then return to the device list after adding successfully.
2: Add networked device process
(1). Open the Eseecloud APP and enter the QR code scanning interface, click”Other ways to add” (Figure 1);
(2). Select the networked device (Figure 5);
(3). After entering the device ID and password(Figure 7), click Complete in the upper right corner, then return to the device list after adding successfully(Fig 8).


1.2.3 Wired connection configuration mode
(1). Confirm that the device is connected to a router with internet access through the network cable;
(2). The subsequent steps for adding are the same as the adding process for networked devices in 1.2.2.
4G spotlight camera management、Flow recharge and abnormal conditions
2.1 4G spotlight camera management、Flow recharge
4G card management:
(1). When the flow is sufficient, it will be displayed normally (Figure 1). When flow reaches the warning value, it will display the current remaining flow(Figure 2);
(2). Click the 4G card management (Figure 3) or the traffic alert value prompt text in the settings to jump to the 4G card management interface (Figure 4), and you can view the traffic usage, signal level, and other information of the4G card in the current interface.
4G card traffic recharge:
(1). In the 4G card management interface,
click the “flow recharge” button (Figure 4), enter the flow purchase interface (Figure 5), select the package and payment method, and then click Pay Now (Figure 6);
(2). After the payment is completed, it will return to the app and display the details of the result.
After the recharge is successful, it will display the recharge device, flow, and other information(Figure 7).
Note: The effective time of recharging is expected to take effect within one hour, according to the situation of each operator.


2.2 4G card device abnormal conditions
When the 4G card device has no traffic and the package expires, the device list displays the corresponding status (Figures 1 and 2). Click to view the details to enter the 4G card details interface, display the corresponding status(Figures 3 and 4) according to the offline reason of the device list, and click the flow recharge to enter the 4G card flow recharge process.
Note: when the camera is inserted into the 4G card that is not provided with the device, it will not support functions such as recharge of the traffic package, traffic query, early warning, etc.(Figure 5).


hi,
I have this system last 9 years, but now my remote viewing is not working its only working with my home WIFI but its not working if i want to view cameras from my office. Please advise.
Are you sure you have internet at home?