ヒント User manual and more software (including CMS), please go to https://eseecloud.app/download/ to download.
Fast Networking
Step:
- Access Network Settings: Right-click the mouse in the main menu and select “fast networking.”
- Configure Automatically: Choose “Auto Config” and click “OK.”
- Manual Configuration (Optional): If you prefer manual configuration, input the IP address and click “diagnose.” A healthy network indication means the Internet connection is good. If there is a network anomaly, follow the provided clues to troubleshoot. Ensure your device has accessed the network.

IPC Set Up
Step:
- Access IPC Settings: Right-click in the main menu, select “Video Manage,” and then click “Refresh” to search for IPCs.
- Adding IPCs:
- Select the IPC searched, then click “add.” The IPC will be added to the target channel.
- Use “Auto add” to automatically add all searched IPCs to the channel list.
- Manage Channels:
- Delete Channel: Delete channel information.
- Edit Channel: Manually revise channel parameters, such as passwords or user names.
- Confirm Settings: Click “OK” to finish the operation.

Video Detection Setup
Step 1: Enable Motion Detection
- Navigate to Settings: Right-click the mouse in the main menu, then go to “System setup” → “Channel setup.”
- Activate Motion Detection: Choose “Video detection,” select “motion,” then click “Enable” and confirm by clicking “OK.”
Step 2: Configure Record Plan
- Access Record Settings: Right-click in the main menu, select “System setup,” → “Record setup.”
- Set Motion Detection for Recording:
- Choose “Record plan,” select “motion,” and then “Choose all.”
- Apply to All: Click “Copy” to apply this setting to all channels.
- Save Settings: Click “OK” to save the configuration.

ビデオ再生
Steps:
- Access Playback: Right-click the mouse in the main menu and select “Video playback.”
- Select Parameters: Choose the date, channel, and record mode.
- Search for Files: Click “Search” to view the playback file.
Playback Controls:
- Rewind and Fast Forward: Use the rewind or fast forward buttons to navigate through the video (x2, x4, x8).
- Play and Pause: Click play to start the video or pause to stop.
- Video Backup: Select the recording file and insert a USB flash disk, then click “video backup” to save the file.
- Timeline Navigation: Click “date” and “time” at the bottom left of the screen to check the timeline of the recording, and click on the timeline with a recording file to play.

ビデオ・バックアップ
Steps:
- Access Backup Settings: Right-click the mouse in the main menu and select “Video backup.”
- Configure Backup Parameters: Choose the channel number and record mode. Set the search parameters by inputting the beginning time and end time.
- Initiate Search: Click “search” to display the recordings.
- Select and Backup: Choose the video that needs to be backed up and click “video backup.”
ヒント Supports up to 32GB USB disk backup. Each recording file is packed every one hour for backup.

Access In LAN
Step 1: Network Configuration
- Fast Networking: Check the IP address of the device.
Step 2: Connect Within LAN
- Browser Access: On a computer within the same LAN, input the video recorder’s IP address and port (if port is 80, no input is needed) in an IE browser or any other browser.
- Login: Access the LAN login page via the web interface, enter the username and password, and click log in.

Step 3: Viewing the Video
- Once you have successfully accessed the system, you will be able to view the video.
ヒント Ensure that the video recorder and computer are on the same network segment for proper connectivity.

Access In WAN
Step 1: Device Identification
- Fast Networking: Right-click in the main menu to check the ID of the device.
Step 2: WAN Access
- Browser Setup: Open Internet Explorer, go to www.e-seenet.com, and enter the device ID in the address bar.
- Login Page: Navigate to the login page, input the ID, username, and password, then click to log in.

Step 3: Video Access
- Access Success: Once access is successfully completed, you can view the video.

ヒント Video quality and fluency depend on the upload speed of the video recorder and download speed of the computer. Each channel requires at least 30KB/s.
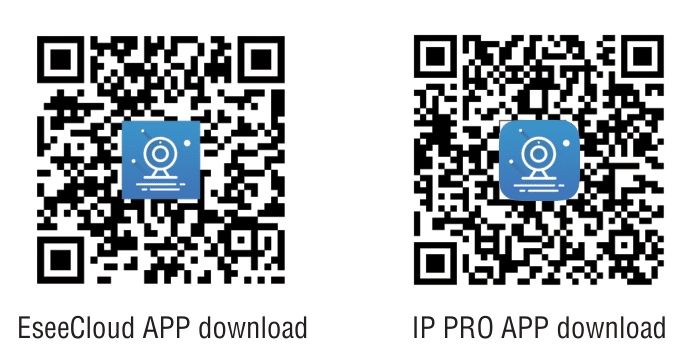
Mobile Application Download and Installation
- Direct Download:
- URL: Go to dvr163 download page on your mobile browser.
- Action: Enter the download page, click install to download and install the application.
- QR Code Download:
- Instruction: Please scan the QR code in the manual to download the application.


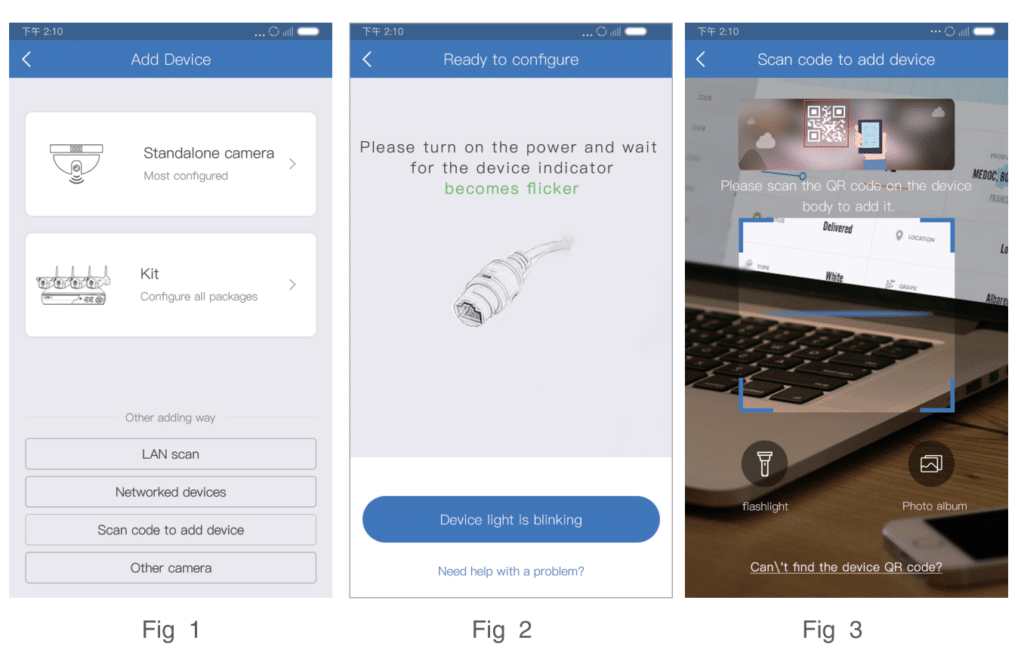
Esee Mobile Application (IP PRO) – Add Device
Step 1: Register
ステップ2: Enter the device interface
Step 3: Add the device
Step 4: Added successfully. Click channel No. to get video
Step 5: Remote playback


Camera works great, but the playback quality is terrible. I look like a ghost walking and am not able to identify myself.
I am unable to locate any support for these cameras.
Hello, may I ask through which channel did you purchase this device? How can I help you?
How do i change the nvr to a new iphone user.
I already downloaded the ios app and have been using it for 2 years but now i need to add an android phone to the system and change the original owner account. I sold it to someone else
I think you may need to reconnect.